Java Tutorial-Static Keyword In Java by-Teachmeandroidhub
Static Keyword:-First of all we need to know about static .This terms defines
stability itself .Suppose your name “aman” so all the person who knows
you they will call you “aman” in case you changed you name then all will
call you with new name mean term related
with static is common for all object of class. Let discuss with a figure.

fig-1 fig-2
According to fig-1 let’s suppose a glass full of water and
two person watching this glass after some time someone has drunk some amount of
water Now glass is half empty and half filled.as like this when we make a
variable static it means it will be available for all objects of class.
Static Keyword in Java: Static Is just a keyword in java “keyword” means
program don’t need to definition static they just have to use it and meaning of
keyword already defined to the compiler. Static Keyword used for memory
management in java. Suppose we have feed bank name of all customer of particular
bank then in this case we will Initialize the variable bank name with static
keyword.
Like this static
string bankname;
We can make following things static in a java program:
1. Variable
2. Block
3. Method
4. Nested Class
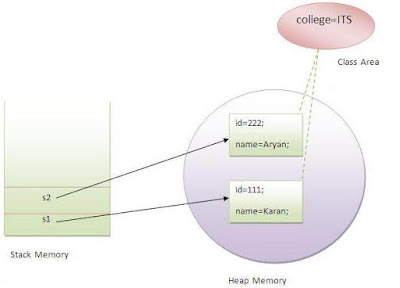
1. Static Variable:-Static keyword added before that variable which common for
all objects like a village name of villagers, college-name of student and sport’s
name of sports man or counties that paly that particular game.
 |
| image source:Google |
For Example: Program to show how static variable work
package com.toy.anagrams.lib;
* @author RAJEEV
public class NewClass {
int x=10;
static int y=20;
public static void
main(String[] args) {
NewClass n1=new
NewClass();
NewClass n2=new
NewClass();
System.out.println("obj one"+n1.x++);
System.out.println("obj two"+n2.x++);
System.out.println("static var"+n1.y++);
System.out.println("obj"+n2.y++);
System.err.println("kyyy"+NewClass.y);
}
}
output:
obj one10
kyyy22
obj two10
static var20
obj21
see I am incrementing x with object one and two both but it
remain same for both because x is instance variable so each object will create
their copy their use but in case Y is incrementing each time because it is static variable and it will be single
copy available for all object. All object have to read and write that
particular copy of static variable.
2. Static Block: It can be applied before main method. Making a block static
you can run a statement without writing anything in main method. Static Block
always executes in order in which, it is written.
 |
| Static block |
Example-Let’s See how Static block works:-
public class StaticBlock {
static{
System.out.println("My Name is Rajeev");
}
static{
System.out.println("My Name is Aman");
}
public static void
main(String[] args) {
}
}
Output:-
My Name is Rajeev
My Name
is Aman
3. Static Method:- If you apply static keyword with any
method, it is known as static method.
} A static method belongs to the class
rather than the object of a class.
} A static method can be invoked
without the need for creating an instance of a class.
} A static method can access static
data member and can change the value of it.
Example: Let’s Learn How Static Method works
class Student{
int rollno;
String name;
static String
college = "Mohali";
static void
change(){
college =
"Chandigarh";
}
Student(int r,
String n){
rollno = r;
name = n;
}
void
display(){System.out.println(rollno+" "+name+"
"+college);}
}
public class StaticMethod{
public static void
main(String args[]){
Student.change();
Student s1 = new
Student(10,"Rajeev");
Student s2 = new
Student(11,"Ritesh");
Student s3 = new
Student(12,"Mkesh");
s1.display();
s2.display();
s3.display();
}
}
4. Nested Class:
A static class i.e. created inside a class is called static
nested class in java. It cannot access non-static data members and methods. It
can be accessed by outer class name.
It can access static data members of outer class including
private.
Static nested class cannot access non-static (instance) data
member or method
The Pattern Follow to create nested class
Class Name{
static class
one{
}
public static void main(string[]args){
}
}
Example: Let’s Understand How Static
keyword work In Nested class
public class StaticNestedClass {
static int x=10;
int a=20;
private static int
u=20;
static class
Rajeev{
void mi(){
System.out.println("static data "+x+" private with static "+u);
}
public static
void main(String[] args) {
StaticNestedClass.Rajeev obj=new StaticNestedClass.Rajeev();
obj.mi();
}
}
}
If You Like My Post Then You can learn about android topic also on this Blog so to stay tuned please follow this blog by clicking following button

Comments